Let’s cut to the chase, shrimp farming isn’t easy – but getting the basics right can keep your ponds productive and disease-free.
Shrimp farming requires hundreds of activities daily. Based on various standard operating procedures (SOPs) and data solutions for farms around Indonesia, below is a list consists of the top tips that every shrimp farmer needs to know. Some of the things from this list are probably very well known compared to the others, but all of the tips will hopefully be useful for your farm.
1. Sterilize everything
Sterilization is an important step to providing a disease-free environment for the shrimp. Before stocking begins, it is important to sterilize all aspects of the farm – the pond itself, all the equipment, and the culture water – to make sure pathogens are eradicated and the risk of disease minimized.
Here's how to start:
- Pond and equipment sterilization
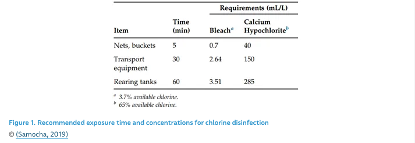
First, clean the pond and equipment with a high-pressure spray containing disinfectants. It is recommended to use 10 ppm of trichloroisocyanuric acid (TCCA) and 30 ppm of sodium hypochlorite. See below for the recommended exposure time and concentrations for chlorine disinfection.
After disinfection, scrub the pond lining to make sure that the biofilm is lifted. Then, remove all the leftover sludge from the previous cycle, as this is a source of pathogens and harmful components. If the farm suffered from a disease outbreak in the previous cycle, use lime with a pH of up to 11 to eradicate spores and prevent further outbreaks in the next cycle.
- Water sterilization
Water sterilization requires two steps: pre-filtration and disinfection. For pre-filtration, use filters with a mesh of less than 200-300 microns at the water inlet to prevent the entry of pathogens, predators, and undesirable solids. The filters should be maintained regularly by rinsing them with clean water and removing any deposits.
As for water disinfection, use chemical disinfectants to eradicate all the pathogens. Apply 20–30 ppm of sodium hypochlorite 60 percent, 0.5–2.5 ppm of KMnO4, and 10 ppm of TCCA to the filtered water for 24 hours. Maintain full aeration during chemical disinfection. To remove the leftover chlorine, use the right amount of sodium thiosulphate by multiplying the leftover chlorine concentration by three. Finally, apply it two to seven times over 24 hours.
2. Improve your biosecurity
In shrimp farming, biosecurity is often disregarded as a mere addition of unnecessary infrastructure and complex procedures with an unclear monetary benefit. However, the importance of biosecurity cannot be overstated since it is one of the key ways to prevent disease on a farm and also further outbreaks in the region; it benefits not only one farmer but also the whole neighborhood.
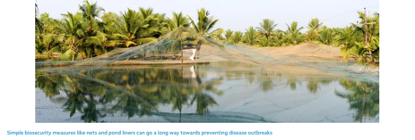
Biosecurity works by preventing pathogen entry and excluding pathogens from the farm. Here are some of the simplest biosecurity measures you can start to implement at your farm.
- Use a pond liner – the most commonly used material is high-density polyethylene (HDPE). Using a pond liner allows easier water control since the water doesn’t interact directly with soil, an interaction that could trigger a complex anoxic reaction, which is highly toxic for the shrimp.
- Protect the farm with fences – to prevent wild animals, such as crabs, which may carry undesirable pathogens, from entering.
- Control the movement of people and vehicles – it is important to make sure that all employees and visitors go through disinfection and cleaning procedures before and after entering and working. All vehicles should go through the same procedures before entry and exit.
- Place feed and probiotics in a specific storage room – to maintain cleanliness, prevent contact from outside vectors that may carry disease, and provide a more stable temperature for feed maintenance.
- Make sure there are labs available in the area – labs are important for two essential things: assessing water quality and checking for diseases. Having a reliable lab in your area is highly beneficial, as doing this check locally is much quicker than, for example, sending the sample of your water or shrimp to another city.
3. Maintain optimum alkalinity level
Alkalinity is one of the most critical water quality parameters since it directly affects pH fluctuation and bacterial composition. It is recommended to maintain alkalinity at 120–150 ppm. Maintenance of alkalinity can be done by applying bicarbonate or carbonate compounds, such as NaHCO3, KHCO3, Na2CO3, CaCO3, and CaMg(CO3)2. It is better to apply treatment periodically rather than when alkalinity spikes occur. To maximize alkalinity increase, the amount applied at each treatment time should not be more than 20 ppm.
To know the right amount of bicarbonate compounds to be applied, you need to know the current alkalinity concentration, which is why periodic measurement is important. This simple formula might help:
(target alkalinity - current alkalinity concentrations)*2
Alkalinity treatment is recommended to be done at night or early morning. Bicarbonate compounds will react with carbon dioxide (CO2) which is more available at night due to the respiration of all organisms.
4. Calibrate all your measurement tools
It might seem simple but before every cycle makes sure that all your measurement tools are calibrated. This includes your dissolved oxygen (DO) meter, pH meter, refractometer, and chemical test kit. Un-calibrated tools might cause a significant error, which may lead to grave mismanagement due to inaccurate data. Calibrated tools may help you gain more accurate data on the conditions of the farm and allow them to make more educated decisions.
5. Assess post-larvae (PL) and shrimp health
Before stocking, PL from hatcheries should be checked regularly – by sight or, even better, by microscope. Shrimp health should also be assessed once a week after stocking. This is beneficial for maintaining optimal shrimp growth and detecting possible signs of disease. The key things to check are:
- The shrimp are swimming actively
- Their morphology is normal
- Their guts are full
- They have no adhering organisms
- There is no cloudiness in the muscle
- The muscle-to-gut width ratio is 3:1
- The hepatopancreases are large and dark
- The gill is white or greyish
- There is no melanization (shown by black to brownish spots)
- There is no molting residue on the shrimp heads
- There are no cuts or twists on their bodies
6. Take shrimp samples regularly
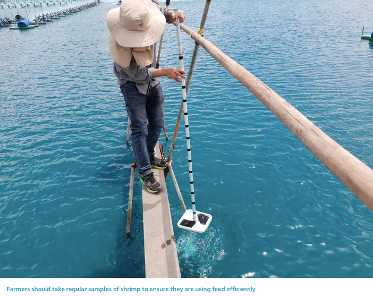
Sampling allows farmers to understand shrimp growth and adjust the feed regime, preventing overfeeding and underfeeding. It is recommended to take shrimp samples every five to seven days using nets appropriate to the current shrimp size. Sampling is done to estimate the mean body weight (MBW), which is calculated by dividing the total weight by the number of shrimp.
What is also important to note is how to take the samples, which should be done representatively. Avoid sampling near the feed trays because the shrimp there tend to be bigger than the rest. Take random samples vertically – covering the top, middle, and bottom of the water column – as well as horizontally, covering various sides of the pond. Avoid sampling when the shrimp are molting.
7. Use the baby bucket method for sampling
The total number of PL obtained from the hatchery is usually ascertained by counting a sample of the PL bags. After stocking, farmers usually do not take follow-up samples, but it is very important to know the survival rate 24 hours post-stocking. It may give us a clearer picture of the shrimp population after they have undergone a stress-inducing process and acclimatization.
We are experimenting with the baby bucket method for estimating the survival rate. The baby bucket is a little bucket with holes on the side covered with mesh. To take a sample, fill the baby bucket with 100 PL and leave it on the surface of the pond for 24 hours. After 24 hours, the PL can be counted to estimate the initial data on population and survival rate. The data is crucial because it can be used to adjust the right feeding regime to avoid overfeeding or underfeeding.
8. Be aware of molting
Molting allows shrimp to grow bigger and is a moment in the shrimp grow-out period that needs particular attention. We need to know the molting phase the shrimp is in by taking regular samples, this way we can better prepare when molting happens. It is better to prepare the right environment by providing enough micro and macronutrients to help the shrimp undergo the formation of the new exoskeleton. This may help prevent molting problems and mortalities due to failed molts. Some of the beneficial minerals to help shrimp during molting are Ca, Cu, Mg, Na, P, K, Se, and Zn.
9. Apply probiotics at the right time
Probiotics are good bacteria that may boost shrimp growth, prevent stress and disease, as well as maintain good water quality. Probiotics are better applied at the beginning of the cycle, helping the juvenile shrimp acclimate to the new environment and enhance water quality. It is also recommended to apply probiotics during stressful situations for shrimp, such as water exchange and partial harvest. The good bacteria work by enhancing the shrimp gut health and maintaining a relatively good environment, both of which decrease the stress level.
10. Implement a nursery phase
Shrimp farmers usually stock PL from hatcheries directly to the grow-out ponds but this is risky because PLs have a relatively underdeveloped immune system. While it requires investment in infrastructure, a nursery phase helps reduce that risk by making sure that the immune systems of the PLs are enhanced before the grow-out period.
To achieve this, PL from hatcheries should be stocked in relatively small nursery ponds or tanks, with a density of more than 2000 PL/m2, for 30 days. The small size of the ponds/tanks means that fewer probiotics are needed and these will be more effective compared to bigger grow-out ponds, thus reducing mortalities and costs.
Conclusion – Implementing the basics
Each farm understandably has specific needs and challenges. However, breaking it down to the basics, these tips apply to various farmers across different circumstances. We hope that these 10 simple tips can help shrimp farmers implement better management regimes for their farms.
← Back to portfolio